Looking for the most compact, simple, cheap, and lightweight alcohol stove on the market? Look no farther than
Zelph Stoveworks' Starlyte Alcohol Stove. Here are the claimed specs from Zelph Stoveworks' website:
Weight: .6 oz
Dimensions: 2" x 2"
Boil Time: 6.5 minutes for 16oz water (1/2 oz of fuel)
Here's how it is supposed to work:
Measure out 1/2 oz of alcohol (HEET brand fuel line treatment).
Pour this into the base of the Starlyte Stove.
Light with a lighter.
Place the windscreen around the stove.
Set your pot on top to boil.
Have boiling water in 6.5 minutes.
 |
The Starlyte (center front) in contrast to
all the various cooking gear in my set. |
Why go with an ultralite alcohol stove?
They can
weigh (in this case) 800%
less than canister stoves. This is pretty considerable as far as weight savings go. No other piece of gear in your pack (probably) can be modified to get an 800% gain in weight savings.
Alcohol fuel can be carried in
exact amounts. For example, if you're out for 3 days and know you'll need one fl oz of alcohol to boil your water per day, you can carry only 3 oz of alcohol. With a canister stove, you're stuck with whatever amount (and weight) of fuel that happens to be left in your canister.
Alcohol stoves don't have any
moving parts (usually) and therefore are highly unlikely to malfunction in the field. The Starlyte stove has even less components than most alcohol stoves.
They're
super cheap. You can make your own for free out of an old soda can. Or buy the Starlyte for $23. Opposed to lightweight canister stoves that will cost you $50-$100.
It's much
easier to find alcohol fuel in many remote areas than it is to purchase canister fuel. This no longer holds true for the Appalachian Trail, however. There is now ample access to fuel canisters at various suppliers along the trail due to the high demand by hikers every year.
What it's like in the real world:
Alcohol stoves are generally much more
vulnerable to physical damage than canister fuel stoves. If you accidentally step on, drop something on, or otherwise abuse your alcohol stove that weighs in at less than an ounce, you can expect it to not survive. Don't take this to mean that these stoves won't hold a pot. Alcohol stoves are made to hold a heavy pot of boiling liquid, but they're not forgiving to damage.
 |
Starlyte (front center) compared to the
Snow Peak Giga Power fuel canister
stove (background) and a mini Bic |
Alcohol stoves
must have a windscreen to use. These stoves don't burn with the intensity of compressed canister fuel. The flame is very vulnerable to wind gusts. Even in a perfectly calm environment, a windscreen is still necessary to conserve the heat energy of the stove. Alcohol stoves don't put out the BTU's that a canister stove can.
It's either on or off with an alcohol stove. There's
no simmer setting. Once you light the flame, it's going to burn at the same intensity until it runs out of fuel.
Some alcohol stoves have the possibility to
spill burning alcohol fuel everywhere if tipped over. The Starlyte stove avoids this by including a fiberglass-like material in the base to soak up the alcohol so that it cannot spill once on fire.
They can be very
precarious to use. The Starlyte has a diameter somewhere around 2". Put a 6" diameter pot will of 16 oz of water on top of this tiny base and you've got a recipe for spilled pasta dinner if you're not on a very flat and stable surface.
What I've found with the Zelph Stoveworks' Starlyte Alcohol Stove:
Disclaimer: I've only done one test so far. Expect to see more results soon, as well as a video.
So is the Zelph Stoveworks' Starlyte Stove the best choice for going ultralight alcohol with your backpacking stove? Here's what I've got to say so far.
The let down:
I used 1oz of fuel (2x the suggested amount) to boil 16 oz (2 cups) of tap water. According to the manufacturer's specifications,
2 cups of water should boil in 6.5 minutes with only 1/2 oz of fuel. My findings?
With the windscreen securely in place, on a mildly breezy day (~8mph winds), my 1 oz of HEET denatured alcohol fuel burned for almost 11 minutes. In my Snowpeak Trek 900 titanium pot, 2 cups (16 oz) of water never reached a full boil. After about 8 minutes the water had developed fish-eyes (bubbles on the bottom of the pot) but by 10 minutes the water was still barely bubbling.
This was very disappointing as I used twice the suggest fuel and still never got a boil going in almost twice the time claimed by the manufacturer's specs.
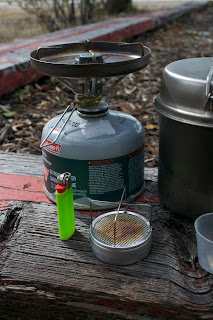
 |
| Starlyte windscreen (right) and alcohol fuel (HEET) |
Other lessons in alcohol stove use:
I also learned that (as stated earlier) it's very difficult to balance a pot full of water on a 2" diameter base. I can easily foresee spilled meals and boiling water in the future with the use of such a slim stove base. There's also nothing on the bottom of the Starlyte Stove to be able to grind into the soil to add stability (as the rim on the bottom of a fuel canister might be used to gain stability).
Furthermore, with my Trek 900 titanium pot, the handles had to be folded in to accommodate the wind screen. This leaves precious little to hold on to when opening the pot lid to stir contents, increasing the possibility of tipping your pot of boiling water over. The windscreen does its job well, blocking wind and holding heat in. Unfortunately all that heat gets channeled up to the pot handles and the pot lid, making it even
more difficult to handle the stove while it's on the already unstable surface.
Conclusion:
At this point I've found out the hard way (as usual) some of the more subtle intricacies of using an alcohol stove. Considering the extremely cheap investment in a piece of gear that I've been curious about for some time, I do not regret the purchase. I plan to paint on some black grill paint to increase the efficiency of my pot and to conduct more controlled and numerous tests with the Zelph Stoveworks Starlyte Stove before giving a final "yes or no" answer as to how I feel about using this stove. For now, however, my canister stove will be staying in the backpack.
Read Backpacking Light's
review of the Zelph Stoveworks' Starlyte Ultralight Alcohol Stove.
BP Light Forum Article on the Starlyte Stove.
Whiteblaze.net forum discussion and development of the Starlyte Stove.


 So you decided you want an outdoor job? You have forsaken the cubicle. Good job, that's step one.
 For your most professional references (bosses, managers, instructors) keep a paper file list. You'll need addresses, phone numbers, emails, the usual stuff. When you're mass-applying for that perfect job, you'll thank me.
 The best camping areas on the Au Sable are Cook and Foote Dam Ponds. Each of these "ponds" (they're more like lakes especially when you're trying to canoe thru them) has a myriad of potential camp sites. Paddle 20 minutes and you're sure to pass by a camp site with impeccable views over the ponds, a rope swing, and a fire circle. The tall pine forests and sandy soil in the area make a beautiful combination.